Before we can get into the real meat of budgeting, it’s important to make a minor but very important mental shift.
Have you ever said something like this: “I get paid Friday, but that whole paycheck’s going to be taken up by the rent.” If so, you’re budgeting backwards instead of forwards, and changing this is the single most important thing you need to change in order to get control of your finances.
Let me explain:
When you’re budgeting backwards, you just pay the last period’s expenses as they happen, reacting to whatever the costs you had ended up being. When you’re budgeting forwards, you anticipate upcoming expenses and plan for them as much as possible. There will always be hiccups (your car breaking down, needing to replace something), but budgeting forwards will put you in a better position to react to unexpected issues.
In order to start budgeting forwards (or perhaps budgeting at all), you need to establish a routine. I advise doing your budget on payday, because that way you can plan what you’re going to spend before you start spending it. This is what a budget might look like for someone who gets paid bi-weekly:
Let’s get into the nitty-gritty here.
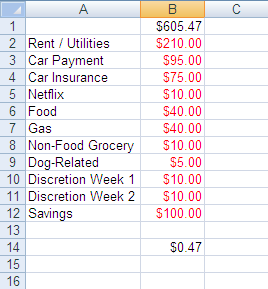
At the top (B1), I enter the exact amount of my paycheck. In the first column, I put what categories I’m allocating money to during this pay period. I usually put the expenses that are time-sensitive at the top, i.e. the expenses that occur on the same day every month. This includes rent, a car payment, car insurance, a phone bill, etc. In this sample budget, the car payment, car insurance, and Netflix will be due during this pay period, so they’re included.
A quick side note. Sometimes, you’ll have a regular major expense that occurs less often than you get paid. For example, you might pay your rent monthly when you get paid bi-weekly. Anytime a regular expense is more than 25% of an average paycheck, I usually suggest dividing it among your monthly paychecks. For example, for this budget, there’s $210 allocated to rent and utilities. By allocating $210 from this paycheck and $210 from the next, you have $420 ready for rent and utilities at the end of the month. It’s much easier to budget that way than having one paycheck where you have to allocate $420 for rent and only have the remainder to allocate towards everything else. And in case you were wondering, all months have at least four full weeks, so if you get paid bi-weekly, you will always have at least two paychecks per month.
Below the time-sensitive items, I usually put essentials which aren’t due on a specific date. This includes food and gasoline. This category has a little more flexibility because you’ll need to eat and probably drive, but if you have a thin paycheck, you can be more economical with your groceries or your driving. Then, there are important but slightly less essential items, such as non-food grocery items (shampoo, soap, etc.), and pet supplies.
At the bottom, I include discretionary spending. This is basically fun money that you can spend however you want. In my experience, including at least a little discretionary spending in each paycheck is very important. If you try to deny yourself any at all, you tend to end up blowing your budget, in the same way that if you try to go on a diet where you don’t allow yourself any sweet treats, you’re much more likely to cave to temptation and then give up on the whole idea. Generally speaking, I suggest capping discretionary spending at no more than 10% of your paycheck.
Finally, I put savings at the bottom. I strongly, strongly recommend putting at least some money towards savings with every paycheck, no matter how little. I personally try to aim for between 15% and 20% of my paycheck, but that might not be feasible in all cases. (Also, if you have credit card debt, I’d suggest putting some of that savings money towards paying it down.)
Where B1 is the cell that contains the amount of your paycheck and B12 is the cell that contains the last cell that contains an allocation.
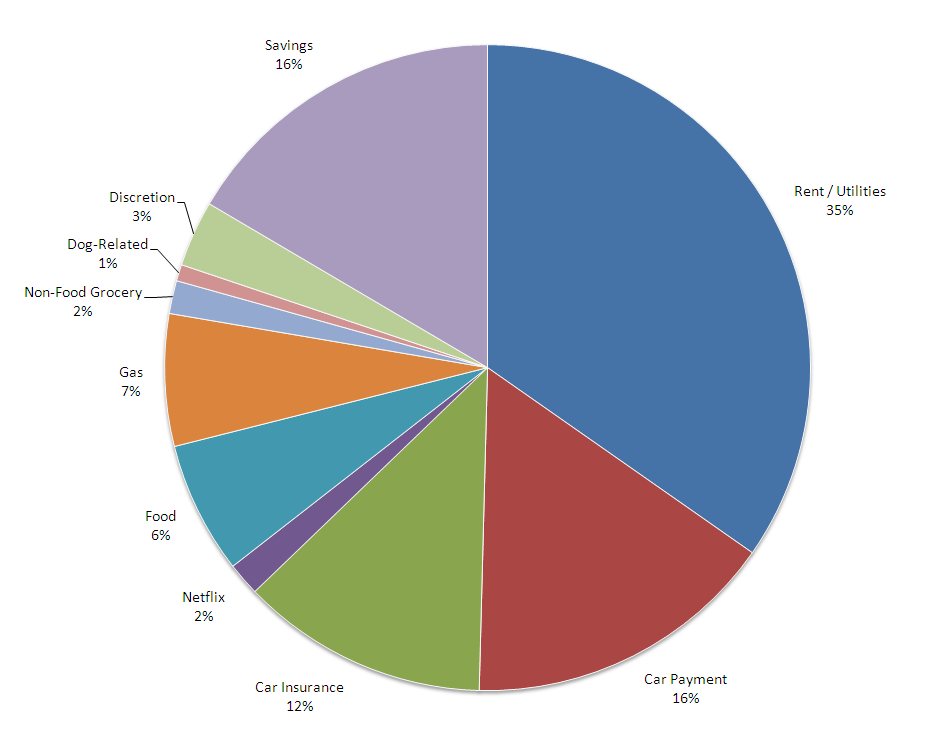
Sometimes it can be helpful to look at your budget as a pie chart. In this case, our budget would look something like this:
Or to group it by categories:
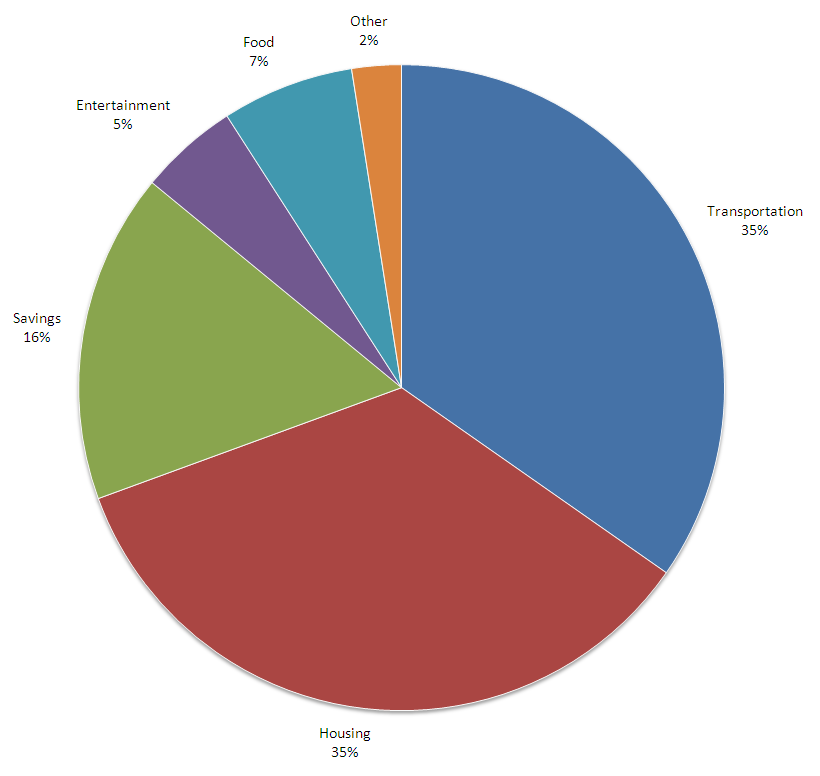
If you need to cut down on your expenses for any reason, this can help you get the birds’ eye view for where you’re spending the most and identify areas where you can trim a bit.
Obviously, making your budget is only the first step. You have to keep to it as well. In order to track my budget, I add two more columns. My running budget looks more or less like this:

In order to make this work, you need to keep all your receipts, regardless of your method of payment. I actually prefer using credit cards over cash because it’s easier to track down a missing charge if you lose a receipt, but we’ll talk about credit in another post. You want to set up the fourth column to show how much money you have left in each category.
Where B2 is the amount you allocated to the top category and C2 is what you’ve spent of it. If you click on the lower right hand corner and drag it downwards, Excel will automatically fill in the formulas to the rest of the cells you drag over.
In the third column, you should enter in your expenses as you go. Your receipts should be entered at least every week; I recommend every two to three days. You’ll find that you tend to overestimate how much money’s still available; I do, and I’ve been carrying a budget like this for years. Entering your receipts regularly will help you keep on track and force you to be aware of how much you’ve really spent, and how much you have left.
Now, go fourth and create a budget!
No comments:
Post a Comment